
In the previous blog post, we learned about the Onion Architecture. Now let’s take a look at how we can implement this. We will start with the Symfony website skeleton and then do all the required changes to get the most basic skeleton that represents the Onion Architecture.
Setting up the layers
So first things first. Install the Symfony website skeleton. This includes the basic packages you need for any general application.
composer create-project symfony/website-skeleton my-project
The next step is to change the directory structure to resemble the layers of the Onion Architecture.
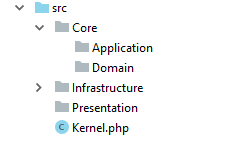
We have the inner layers, which we call Core. In here Domain and Application. Then the Outer layers are our Infrastructure and Presentation.
Domain
But let’s take a deeper look at the Domain layer.
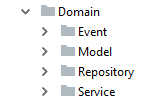
As you can see we have split this up in some subdirectories. It’s up to you how you do this. These are just some basic suggestions and the ones I start from. This can change based on project requirements. I always place my Domain Objects (or Entities) in the Model directory. In Repository, I place my repository interfaces. Events and Service for your domain events and domain services. You can make more directories if required.
Application
And then the Application layer.
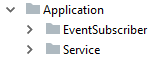
In the application layer, we always have at least some application services and event subscribers. But most of the time you will have to create multiple subdirectories here based on your project.
Doctrine
In doctrine.yaml we are going to change the mapping to XML. We should also create a new directory src/config/domain/doctrine for our XML files.
mappings:
    App:
        is_bundle: false
        type: xml
        dir: '%kernel.project_dir%/config/domain/doctrine'
        prefix: 'App\Core\Domain'
It’s important to remember that the ORM mappings file name needs to follow the directory structure and name of your domain objects start from App\Core\Domain\Model.
If you have a domain object App\Core\Domain\Model\User\User then the XML file should be named User.User.orm.xml.
Because our migrations are now in the Infrastructure layer, we also need to change the doctrine_migrations.yaml file.
doctrine_migrations:
    dir_name: '%kernel.project_dir%/src/Infrastructure/Persistence/Doctrine/Migrations'
    namespace: App\Infrastructure\Persistence\Doctrine\Migrations
Now Doctrine is configured to work with our updated directory structure.
Presentation
For the presentation layer, we will create an API and a Web directory. In most web applications that you build, you will probably need web controllers and/or REST controllers.

Then for your web controllers, you might want to create a back office and a public front end. In this skeleton, we will create a basic setup to handle these situations.

Note that inside our Backoffice and Pub directory we have Asset, Controller, Form and Twig.
Inside Asset, we place our js and CSS files. The controller and form are our Symfony controllers and forms. And in the Twig directory, we will place our twig template files.
Before we can use this setup, we need to change some settings. Symfony needs to knows where to find the controllers and what their path is. In services.yaml we replace the default controller configuration with the following:
# controllers are imported separately to make sure services can be injected
# as action arguments even if you don't extend any base controller class
App\Presentation\Web\Pub\Controller\:
    resource: '../src/Presentation/Web/Pub/Controller'
    tags: ['controller.service_arguments']

App\Presentation\Web\Backoffice\Controller\:
    resource: '../src/Presentation/Web/Backoffice/Controller'
    tags: ['controller.service_arguments']

App\Presentation\Api\Rest\Controller\:
    resource: '../src/Presentation/Api/Rest/Controller'
    tags: ['controller.service_arguments']

# add more service definitions when explicit configuration is needed
# please note that last definitions always *replace* previous ones
Then we also need to change routes/annotations.yaml.
web_pub:
    resource: ../../src/Presentation/Web/Pub/Controller/
    type: annotation
web_backoffice:
    resource: ../../src/Presentation/Web/Backoffice/Controller/
    type: annotation
    prefix: /admin
api_rest:
    resource: ../../src/Presentation/Api/Rest/Controller/
    type: annotation
    prefix: /api
So our back office paths will be on /admin and our REST API endpoint is /api. You can change this to your liking.
Twig Namespaces
You will have noticed that instead of using the default templates directory for twig. We have 2 separate Twig directory for the Back office and the Public web pages. We can do this by using Twig namespaces.
In twig.yaml you need to create the following configuration:
twig:
    paths:
      '%kernel.project_dir%/src/Presentation/Web/Backoffice/Twig': BackOffice
      '%kernel.project_dir%/src/Presentation/Web/Pub/Twig': Pub
    debug: '%kernel.debug%'
    strict_variables: '%kernel.debug%'
Now if we want to render a BackOffice template we need to use the following string to render it.
return $this->render('@BackOffice/dashboard/index.html.twig');
This will then render the file src/Presentation/Web/Backoffice/Twig/dashboard/index.html.twig.
What about the ports?
When I first tried to implement the Onion Architecture. I wondered, where should I place my ports. The interfaces that the adapters in your Infrastructure should implement. Well, you place them in the Domain or Application. Does your domain need to know about the existence of an interface adapter? Then create an interface in your Domain. Does your application need to know about the infrastructure? Well then create an interface in your application layer.
There is never a right or wrong answer. It’s all about keeping some concepts and ideas in the back of your mind, and then think logically, and apply them.
Finished
So now we have to build a simple Onion Architecture skeleton with Symfony. You can take this as a base to kick-start development. You can find the finished version here.
The idea for this skeleton is to give you a basic template to start from. Adapt it to your needs and project. And it might be a good idea to think about some other ideas and concepts that you will use.
As always, think before you code!